Wednesday, April 25, 2012

X-Tinytrack Project - base concept from TRACKUINO * on ARDUINO

*Thank you  to Javier Martin( *Courtesy from Trackuino.org) who wrote many of the libraries and codes for the APRS tracker.  I will give him most of the credit of my project .  I design PCB as to be used with the regular HT and GPS module from ARGENT DATA $36 very high sensitive indoor still can fixed GPS data.  I was reading Trackuino.org made by Javi and I do not know where I can have PCB so then I build it and then here that I have. Arduino is cheap and easy to develop to get the project going fast.


TRAKUINO code with adding LCD , Softserial Feature(Thank Javier Martin for helping)
Have the Heading in degree , Speed,  and time. Good for small Bicycle Speedometer?

PCB Design base on the *Trackuino Code ( *Courtesy from Trackuino.org) but have some modification that have to move native serial port to NewSoftserial.h  port , adding GPS connector , Adding LCD and also be able to use the regular HT.  I build PCB just for the min as I want to try out my design and worked . I will redesign again to be able to use . MX-1 (VHF module 144.390 300mW)  email me for the code.

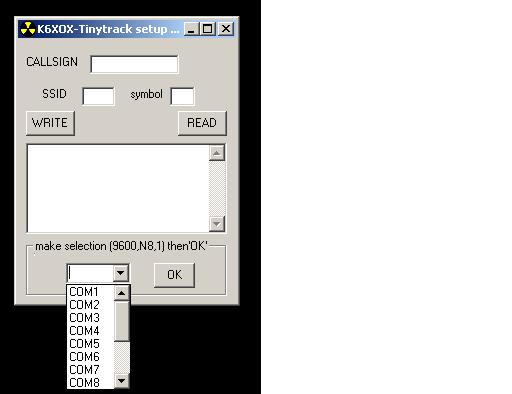
I did write the Code on VB 6 just simple for some HAM who want to use my PCB and did not want to go to Arduino IDE just use GUI to program Callsign, SSID, Symbol connect to this board and PC comm or visual serial port then program to Arduino EPROM. as below:-

1st select Com number then click ok to activate the serial and establish the connection between board and PC then just read from board memory and then edit Write to eprom just simple is that.


I wrote my own code to GPS decode and display on LCD and also included the SMART Beacon reflect to the speed , slow and fast for more freq beacon.
Feature:-

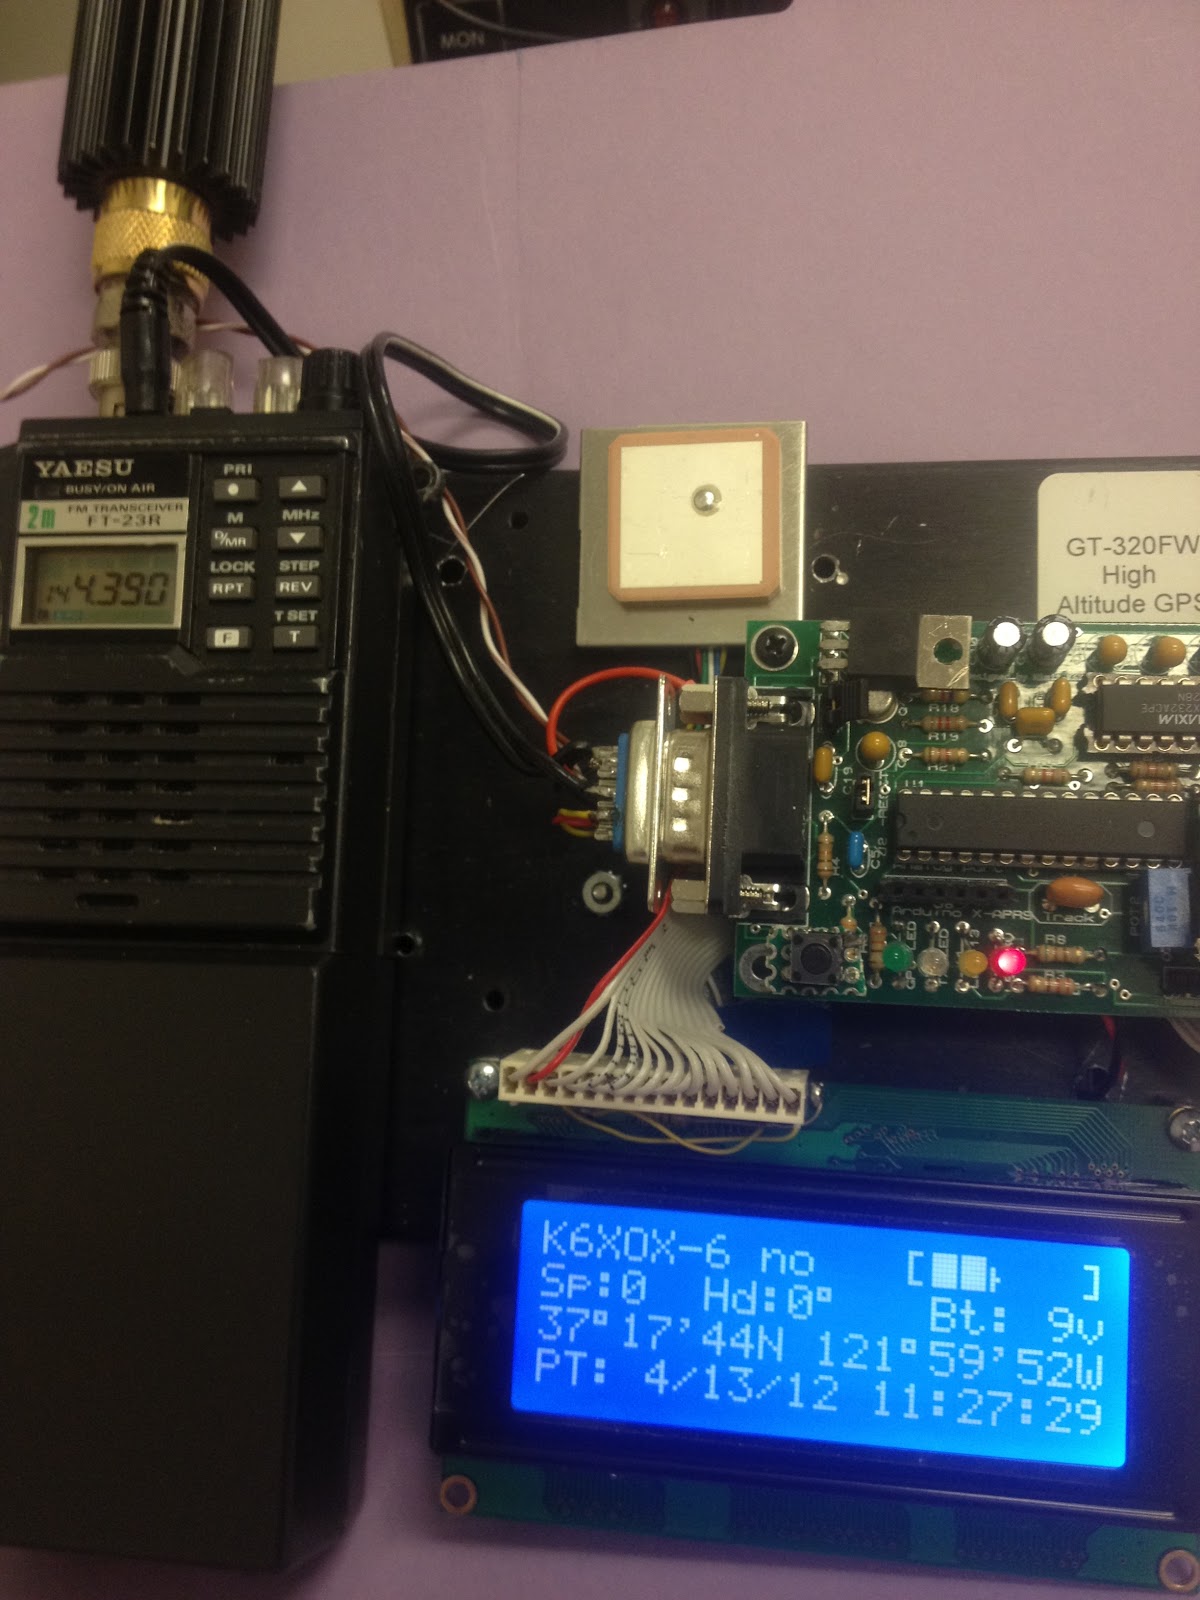
Display Speed , Heading ,  Battery Bar graph level , PST time , LAT , LON 

I also tested out the original Trackuino and it worked pretty good with this unit.  original Trackuino used the Radimetrix MX1 $40 but I have many of my HT so that I used my design to work with HT so that can put in to small metal box somewhere.   Nice project,. I guessed

Completed Unit that I build in Rev.1 LED status in case of no LCD display

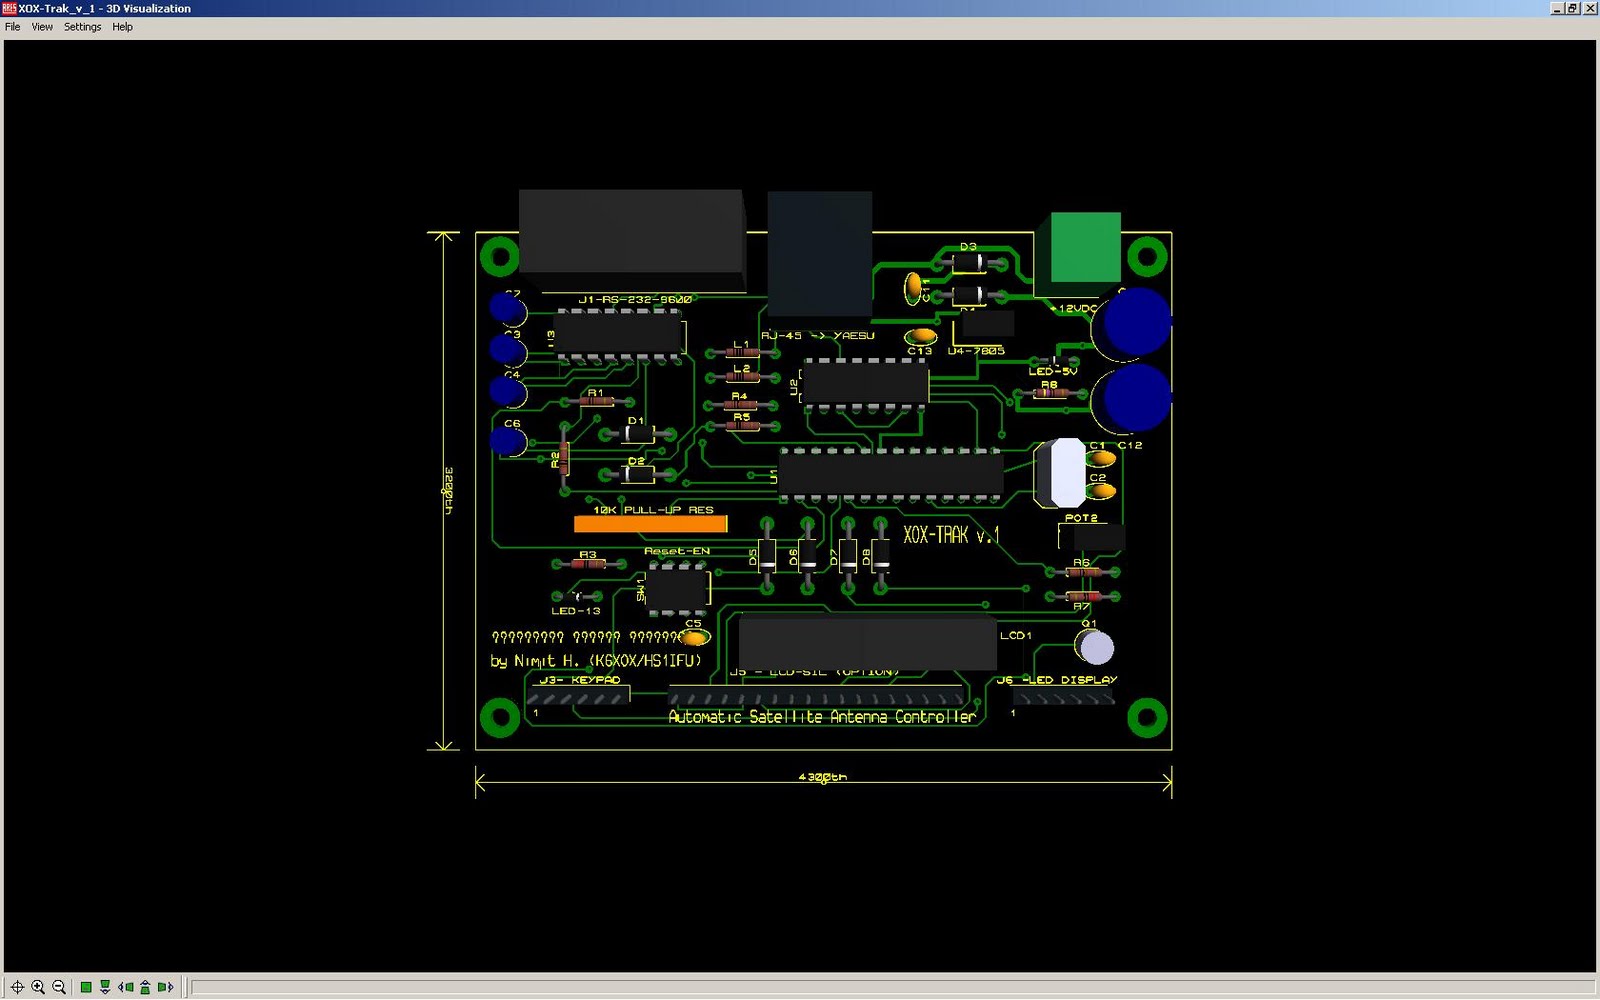
Proteus software to design
3D model same as the actual one. 


Geiger Counter + APRS project with Arduino Boot loader


Design the PCB and combined the Geiger Counter with APRS so that when measuring the radiation this unit can send the position via APRS network to appears on Google Maps. I did not write all the code and this have 2 sections of the Code which I combined them together and it worked , it took me many days to test and make sure got the good packet to the IGATE (Aprs server) 

Credit list of people who provided information and has been used in my project:- 
  • Geiger Counter Kit has Code and Calculation by John Giametti here is his web link  
  •  APRS libraries wrote to by Javien Martin - www.trackuino.org   
  • Softserial and GPS decoder library to elighcash posted sample code so that I can understand how to decode the GPS message on Arduino Playground Forum.  

  • GPS Module from Argent Data $36  very good / high sensitive
    VHF narrow band Radio Module pre programed 144.390 MHz 300mw (150mA only)  from RadioMatrix MX-1 $40 USD
    Combined them together on Demo Board will appear at Amateur Radio Booth,
    Maker Fair 2012 May 19,2012 at San Mateo Fair ground , CA


Visual Diagram 

Just finished and it worked
Completed with SBM-20 and GPS module

My Work Bench 
PCB ordered from China only 10 pcs

1st prototype insert into the CDV-715
Power coating

Prototype with wiring 

Tuesday, July 5, 2011

XOX-TRAK AMSAT antenna controller project - Azimuth/Elevation Rotor Control GS-232 Yaesu Standard for G-5500

Finally, My XOX-TRAK project already finished with completed PCB and assembly worked !!!. 


Updated on the PCB and schematic, I guessed this revision will be the final, I ordered PCB to China for 10 PCs and Hope everything will be ok not need to debug after that then I can move on to next project.  

If I can build kit for the Low cost with modern Arduino that should be cheap and less than $40.  PCB design sometime was easy and some time was pain and took too much time just to make sure the tiny trace made mistake from the auto-route algorithm.  I used old version of Proteus software and I found that very easy to use that I learned from Youtube video tutoring..  So many PCB company around here in USA and in China. Express PCB will cost me around $70 for 10 only 2 side no silk screen compare to China cut the cost in half but I have more the layer and silk screen component,

 I need PCB to be easy and perfect for beginner to build so that I try to use all the simple package that can be found at many of the electronic component store near by your area.  I used the RJ-45 for the interface cable, This can be easy if you have Network cable laying around just cut one end and the other end can be used for plug in to the G-5500 or any motor controller that required the Active"low" , I have the spare option for someone already have LCD  14 Dual in line ribbon and 14 Single in line cable. I have both of them and I though might be useful if I can add both of them in the same PCB, so someone will not need to go buy extra or make the stupid cable for the difference type
I got many emails from Ham around the world  asked me how they can build one like this, so then Email me if you like it or need it.  I will build on order  as completed kit or Kit.  I have many of the aluminum box but need to cut for LCD and paint, so that might be too luxury for the cheap kit.  
My email:-  k6xox at arrl dot net

THIS IS NOT THE BUSINESS , Just hobby
I only have 10 PCBs to be builded which already sold OUT and I will not order or build PCB for this project anymore. I will move on to the next project in the future.


Kit Include:- 

Completed Assembly with LCD 2x16 

Not included:- 

- Keypad  (Option)
- LED display (option)


3 D of the top PCB component side
3D bottom side

Ordered PCB to China from July 20 and arrived on July 28 not bad and Perfect no error to debug. 


 put the component and power up worked as expected.  Nice 

Email me : k6xox at arrl. net 


Monday, June 27, 2011

ARRL FieldDay 2011

One of the land owner that we found him sneak around, harmless snake.
 My Automatic AMSAT tracking station: IC910 + Orbitron + AZ_EL (Arduino Controller)
 With Thai Flag for only HAM Thai in this area (HS1-IFU)
 My Friend Gerry (K6TXD) set the Solar power to charge battery for Emergency communication

 CW station

Cushcraft 2m/70cm 3 Element Beam compared with Arrow Antenna:-  Resulted  Arrow Antenna worked much better received on UHF very loud much better than Cushcraft. Arrow much cheaper too,. 

 from BBQ side you can see my station on the left and CW station on the right
 My AMSAT tracking Station and also 6 meter(50Mhz) on the right
 the other angle of the AZ-EL Rotor
 6 Meter( 50Mhz) and VHF antenna (ringo Ranger)
 Evening BBQ for visitor and member of the society
 from the location look down to the freeway to see how good the loaction was
 Manual Tuner from MFJ that used for 160 Meter band
with Gerry (K6TXD) and me K6XOX / HS1-IFU

Tuesday, May 31, 2011

Modified the Old KENPRO KR-400 and KR-500 to used with My Arduino controller

FARS (Foothills Amateur Radio Society) have the old AZ-EL KR-400 and KR-500 rotor set that we used for Field day in every year, It was kind of rusty and dusty,  I brought it to clean up then wash and then  modified the bracket and adding relay because of there have the AC-24 voltage Motor and cannot be used with H-Bridge controller like DC-Motor.

After Tested with the new controller then I found that Original KR-400 has the scale which indicated North (0) at the center scale, it will confused the user if the Rotor turn from 0 to 360 Max then I start to modify the scale to match the real position.

SCALE Part :-  
For the KR-400 to display 0 - 360 not the 180-0-180 as the original Kenpro designed then It need to scan the original scale and then cut and paste then move around the number of degree to have South as Center of the scale to match 0 volt and full scale as 5V then I used the Paint-Brush program to edit and print the actual size to match the scale plate.

(Final )South Centered scale for KENPRO- KR 400 Controller
Use the Mouse Right Click the "Save As"  then open with MS-Paint brush program for printing.
 Original KR-400 North Center Scale
 Paint Brush program used for edit and Print to my Color laser printer. the hard part was print to be the same size as original scale, I did try the Window view print but it seems hard to control but if I use the Print-Brush program to print directly to printer then I got the right scale. that was some trick.
 Removed the Panel Meter

 then used the back-side of the scale aluminum plate to glue the new scale with my paper print-out.
All Done. Look like never has been modified :) 

Controller Part:- 

First, I  want to use the solid-state relay or the "HEXFET"  PVG612PDF from IR to controller AC motor but I checked price per part if I will order from Digikey or Newark around $8-$ +S&H and I will need 4 of them, well cost will be like $34 USD and since this is not the my controller and I build for my HAM Club so then non profit at all and need to be as conservative budget as perfect as I can then I found the many of my 12 V relays laying around my old component box so then I modified the relay board to be used for 2 Transistors which will receive active  "LOW' level logic from my Arduino controller and the add 6 Volt 7806 for the POT encoder voltage because of the long cable dropped the voltage below 5V when it fully turn to maximum. All worked up pretty good,  Need to do paint job with my Controller box (Powder Coating) .   I was thinking about build the nice Kit for other Ham too, let see if I have time left.
Completed with Both AZ-EL box modification test and worked..

Serial Arduino board was used in this project due to unstable USB sometime on sleep never wake up not like direct serial port with MAX-232 pure and simple work as good as you need. ATMEGA328 chip become very cheap now a day, in the previous project that used 16F84 already obsolete and used Assembly language to program also too old to debug and LVB tracker that also used 16F876 also used very old C- compiler then I found the Arduino more fun to program and play as I can say that "even CAVE Man can do it" also I have seen 8 year old program Arduino then why not jump in and found how easy and so much function library that I can play.  The Cost of the chip if you buy from Digikey or Newark $2.89 USD Blank no boot loader and I have programmer from $13 USd so I can do much more project as cheap as I need.
Feature :Remote controller with Small SONY Car radio Remote. Nice!!!
at the back of this controller that I used RJ-45 standard which can be used either one of them wiring as parallel and can be connect direct to DIN 8 connect to Yaesu 5500 
Tested and work pretty goodwith My Arduino

I used RJ-45 because easy to find around me in my office and it free also have 8 wires which perfect and twist wire help to reduce the noise from AC motor as well.  the hard part was cut the hole to match the square  RJ-45 female in PCB inside. not pretty but it was not that bad.
2 relays added for controll 2 AC coils both direction.

Sheet Metal work at Tech-Shop made my work mush easier